Tipp
Falls du Azure Kubernetes Service nicht nutzt, kannst du die Bereitstellung dennoch mit Azure Container Apps oder einer anderen Bereitstellungsumgebung automatisieren.
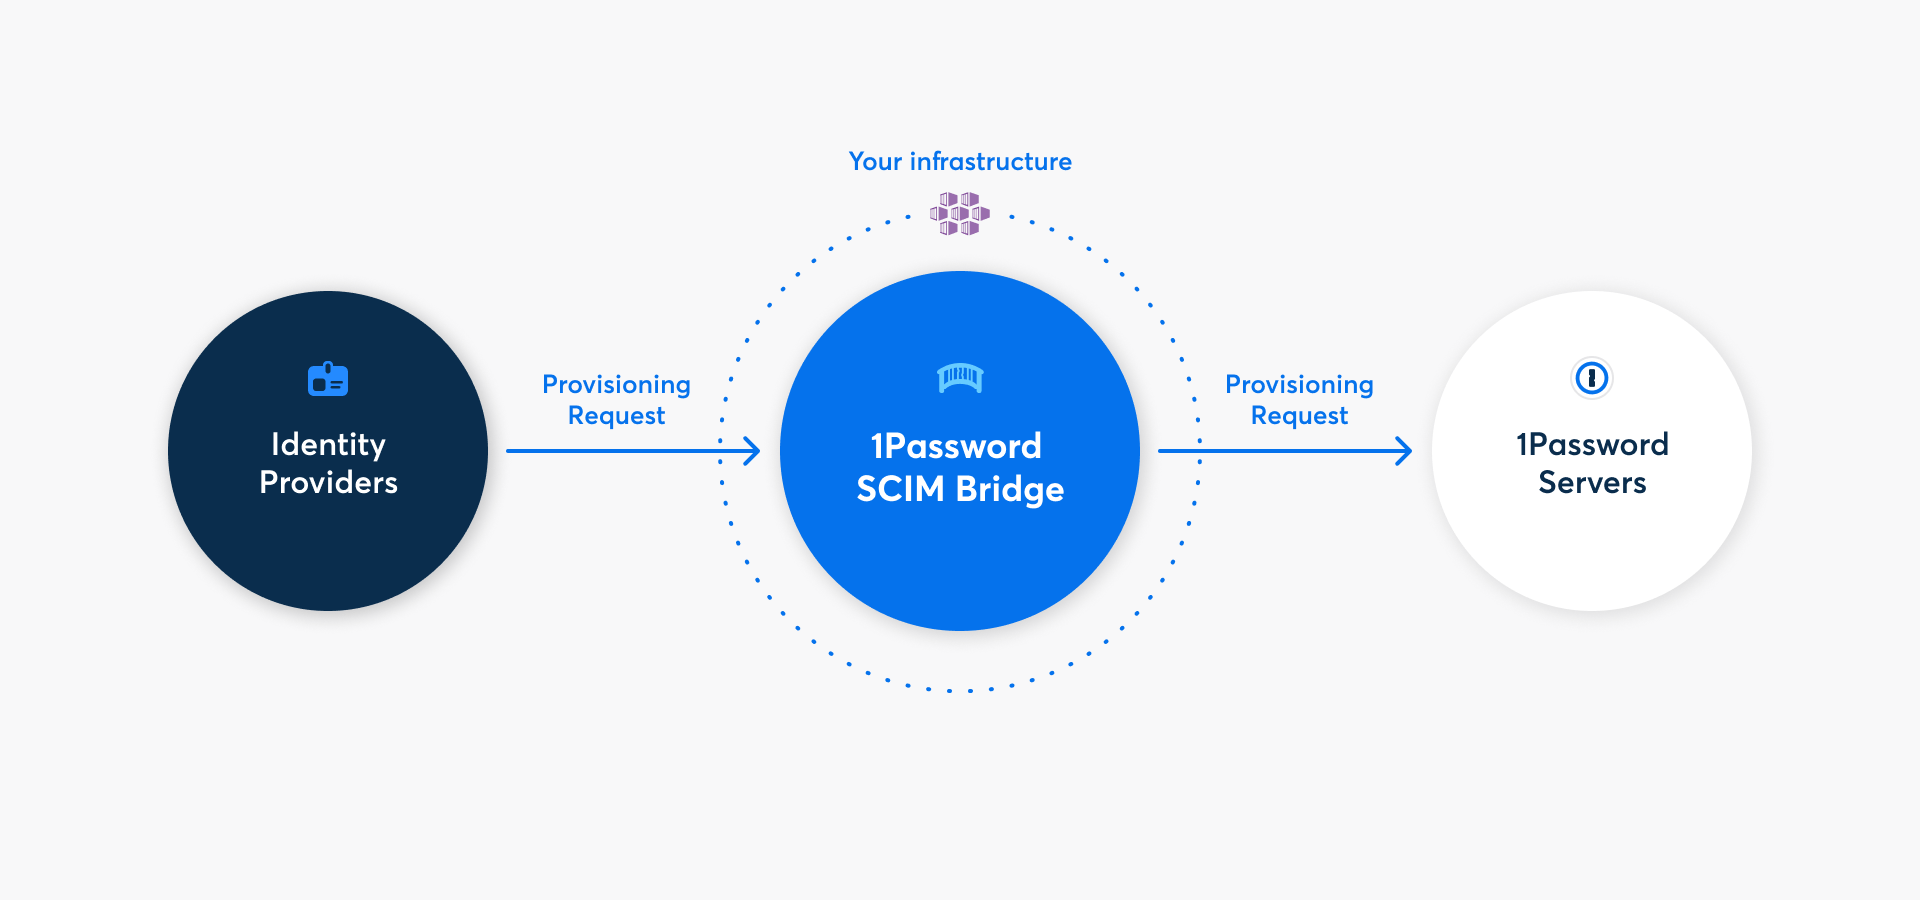
Mit 1Password Business kannst du viele gängige Verwaltungsaufgaben mit der 1Password SCIM-Bridge automatisieren. Es nutzt das SCIM-Protokoll (System for Cross-Domain Identity Management), um 1Password mit deinem bestehenden Identitätsanbieter wie Google Workspace, JumpCloud, Microsoft Entra ID, Okta, OneLogin oder Rippling zu verbinden.
Schritt 1: Füge deinem 1Password-Konto Provisioning hinzu
Bevor du die 1Password SCIM-Bridge bereitstellen kannst, musst du die Bereitstellungsintegration hinzufügen und Zugangsdaten dafür erhalten. Klicke auf Loslegen, melde dich bei deinem 1Password-Konto an und folge den Anweisungen auf dem Bildschirm.
Wenn du die Details einer bestehenden Bereitstellungsintegration siehst, musst du sie zuerst deaktivieren. Klicke auf Weitere Aktionen und wähle Bereitstellung deaktivieren.
Nachdem du den Einrichtungsprozess abgeschlossen hast, erhältst du eine scimsession-Datei und ein Bearer-Token. Speichere beides in 1Password und speichere die scimsession-Datei auf deinem Computer. Du brauchst sie, um die SCIM-Bridge einzurichten und deinen Identitätsanbieter zu verbinden.
Wichtig
Das Bearer-Token und die scimsession-Datei, die du bei der Einrichtung erhältst, können zusammen verwendet werden, um auf Informationen aus deinem 1Password-Konto zuzugreifen. Du musst das Bearer-Token mit deinem Identitätsanbieter teilen. Allerdings solltest du es niemals an andere Personen weitergeben. Außerdem solltest du deine scimsession-Datei niemals an andere weitergeben.
Schritt 2: Erstelle und konfiguriere den Kubernetes-Cluster
2.1: Sammle Informationen über deine Umgebung
Melde dich bei deinem Konto auf dem Microsoft Azure-Portal an.
Klicke oben rechts auf die Cloud Shell .
Erhalte eine Liste deiner Azure-Abonnements:
az account list -o tableFinde ein Abonnement, das du für die Bereitstellung der SCIM-Bridge verwenden möchtest, und notiere dir dessen
NameoderSubscriptionID.Erhalte eine Liste der verfügbaren Standorte in deinem Azure-Konto:
az account list-locations -o tableWähle deinen bevorzugten Serverstandort (Region) für die Bereitstellung und notiere dir den
Namen, z. B.eastus.Wähle eine bestehende Ressourcengruppe oder erstelle eine neue.
Um eine Liste der vorhandenen Ressourcengruppen zu erhalten:
az group list -o tableSo erstellst du eine neue Ressourcengruppe:
az group create --name <desiredName> --location <locationName>
Notiere dir den Namen der Ressourcengruppe, die du für die Bereitstellung verwenden möchtest.
Nachdem du diese Schritte abgeschlossen hast, solltest du die folgenden Details haben:
NameoderSubscriptionIDdes Abonnements.- Standort (Region).
- Name der Ressourcengruppe.
2.2: Erstelle den Cluster
Die SCIM-Bridge muss in einem Azure Kubernetes Service-Cluster eingesetzt werden. Um den Azure Kubernetes Service-Cluster zu erstellen, in dem du die SCIM-Bridge einsetzen willst, kopierst du den entsprechenden Befehl für deine Shell in einen Texteditor und änderst die <placeholders> in die Werte, die du in Schritt 2.1 notiert hast.
Bash:
az aks create -n op-scim \
	--enable-cluster-autoscaler \
	--node-count 1 \
	--min-count 1 \
	--max-count 3 \
	--node-vm-size Standard_B2s \
	--load-balancer-sku basic \
	--node-osdisk-size 32 \
	--resource-group <resourceGroupName> \
	--generate-ssh-keys
PowerShell:
az aks create -n op-scim `
	--enable-cluster-autoscaler `
	--node-count 1 `
	--min-count 1 `
	--max-count 3 `
	--node-vm-size Standard_B2s `
	--load-balancer-sku basic `
	--node-osdisk-size 32 `
	--resource-group <resourceGroupName> `
	--generate-ssh-keys
Nachdem du den Befehl für die Bereitstellung bearbeitet hast, führst du ihn in der Cloud Shell aus. Es kann ein paar Minuten dauern, bis Azure deinen Cluster erstellt hat.
Wenn du eine Shell-Benachrichtigung siehst, dass der Cluster erstellt wurde, fährst du mit dem nächsten Schritt fort.
Schritt 3: Einrichten und Bereitstellen der 1Password SCIM Bridge
Tipp
Wenn du mehr als 1.000 Teammitglieder verwaltest, sieh dir den Anhang mit den Ressourcenempfehlungen auf GitHub an, um deine Bereitstellung an deine Bedürfnisse anzupassen.
3.1: Verbinde dich mit deinem Kubernetes-Cluster
- Öffne die Kubernetes Services Page.
- Klicke auf den Namen des Clusters, das du gerade erstellt hast. Wenn du den Namen in der obigen Vorlage beibehalten hast, wird er
op-scimgenannt. - Klicke oben auf der Seite auf Verbinden und dann auf Cloud Shell öffnen, um dich mit dem Cluster zu verbinden.
Wenn du die Cloud Shell bereits geöffnet hast, führe die im Bereich „Verbinden“ aufgeführten Befehle Set the cluster subscription (Clusterabonnement festlegen) und Download cluster credentials (Clusteranmeldeinformationen herunterladen) aus.
3.2: Klone das scim-examples-Repository
Alle Konfigurationsdateien, die du für die Bereitstellung der SCIM-Bridge benötigst, sind im scim-examples-Repository auf GitHub verfügbar.
Wechsle in das Verzeichnis, in dem du das Repository klonen möchtest, und führe dann den folgenden Befehl aus:
git clone https://github.com/1Password/scim-examples.git
Wechsle zum Kubernetes-Verzeichnis im geklonten Repository:
cd scim-examples/kubernetes
3.3: Lade deine scimsession-Datei hoch
Bevor du das Kubernetes Secret erstellst, lade deine scimsession-Datei in die Cloud Shell hoch:
- Klicke auf die Schaltfläche Upload/Download files (Dateien hochladen/herunterladen) und wähle Upload (Hochladen).
- Finde die
scimsession-Datei, die du auf deinem Computer gespeichert hast, und wähle sie aus. - Notiere dir das Ziel für den Upload und klicke dann auf Complete (Fertigstellen).

3.4: Das Kubernetes Secret erstellen
Führe den folgenden Befehl aus, um das Kubernetes Secret zu erstellen:
Bash:
kubectl create secret generic scimsession --from-file=scimsession=/home/$USER/scimsessionPowerShell:
kubectl create secret generic scimsession --from-file=scimsession=/home/$Env:USER/scimsession
3.5: 1Password SCIM Bridge bereitstellen
1Password SCIM Bridge verwendet eine Redis-Instanz, um dein Let’s Encrypt TLS-Zertifikat zu speichern und zwischenzuspeichern. Stelle die Konfiguration, 1Password SCIM Bridge, Redis und den Load Balancer mit dem folgenden Befehl bereit:
kubectl apply -f .
3.6: Erstelle den DNS-Eintrag
1Password SCIM Bridge erfordert einen öffentlichen DNS-Eintrag auf einer von dir verwalteten Domain. Bevor du den DNS-Eintrag erstellst, besorge dir die externe IP-Adresse des Load Balancers:
kubectl get services
Wenn du die IP-Adresse in der Spalte „Externe IP“ nicht siehst, warte ein paar Minuten und versuche es erneut.
Füge einen A-Datensatz hinzu, der auf die öffentliche IP-Adresse des Load Balancers verweist. Wenn deine Domain zum Beispiel example.com lautet, verwendest du scim.example.com.
Tipp
Der gesamte SCIM-Bridge-Traffic nutzt Port 443. Wenn du die Azure Firewall verwendest oder den Zugriff auf die 1Password SCIM-Bridge einschränkst, öffne Port 443 für deinen Azure Kubernetes-Cluster. Let’s Encrypt erfordert Zugriff auf Port 443, um das TLS-Zertifikat alle 60 Tage zu erneuern.
3.7: Konfigurieren und Aktivieren von Let's Encrypt
1Password SCIM-Bridge verwendet ein von Let’s Encrypt bereitgestelltes TLS-Zertifikat, um die Kommunikation mit deinem Identitätsanbieter zu sichern.
Setze den vollqualifizierten Domainnamen (FQDN) basierend auf dem DNS-Eintrag, den du im letzten Schritt erstellt hast (zum Beispiel: scim.example.com) als Wert für OP_TLS_DOMAIN:
kubectl set env deploy/op-scim-bridge OP_TLS_DOMAIN=scim.example.com
Schritt 4: Teste deine SCIM Bridge
Wichtig
Bevor du die SCIM-Bridge mit deinem Identitätsanbieter verbindest, stelle sicher, dass du dich mit der SCIM-Bridge verbinden kannst:
- über eine gesicherte (HTTPS) Verbindung
- mit einem gültigen TLS-Zertifikat
Um zu überprüfen, ob sich das DNS propagiert hat und die SCIM-Bridge erfolgreich eingesetzt wurde, rufst du die Domain, die du im vorherigen Schritt konfiguriert hast, in deinem Browser auf. Es wird eine 1Password SCIM Bridge-Statusseite angezeigt. Gib dein OAuth-Bearer-Token ein, um zu überprüfen, ob es korrekt ist.
Verwende dein Bearer-Token und deine Domain (zum Beispiel: scim.example.com), um die Verbindung zu 1Password zu testen:
curl --header "Authorization: Bearer <bearer_token>" https://<domain>/scim/Users
Wenn du eine Liste der Benutzer in deinem 1Password-Konto siehst, ist deine SCIM-Bridge korrekt bereitgestellt.
Schritt 5: Verbinde deinen Identitätsanbieter mit der SCIM-Bridge
Wichtig
Wenn du bereits 1Password Business verwendest, solltest du sicherstellen, dass die E-Mail-Adressen und Gruppennamen in deinem 1Password-Konto mit denen deines Identitätsanbieters übereinstimmen.
- Wenn jemand eine andere E-Mail-Adresse in 1Password verwendet, bitte ihn oder sie, diese zu ändern.
- Falls du bereits bestehende Gruppen in 1Password hast, die du mit Gruppen in deinem Identitätsanbieter synchronisieren möchtest, passe die Gruppennamen in 1Password an.
Da die 1Password SCIM-Bridge einen SCIM 2.0-kompatiblen Webservice bietet, der OAuth-Bearer-Token zur Autorisierung akzeptiert, kannst du sie mit einer Vielzahl von Identitätsanbietern nutzen.
Erfahre, wie du deinen Identitätsanbieter verbinden kannst:


Unterstützung erhalten
Hol dir Hilfe bei der SCIM-Bridge, zum Beispiel wenn du dein Bearer-Token oder deine Sitzungsdatei verloren hast.
Um weitere Hilfe zu erhalten oder Feedback zu geben, kontaktiere den 1Password Business Support oder nimm an der Diskussion mit der 1Password Support Community teil.