Tipp
Falls du Azure Container Apps nicht nutzt, kannst du die Bereitstellung dennoch mit dem Azure Kubernetes Service oder einer anderen Bereitstellungsumgebung automatisieren.
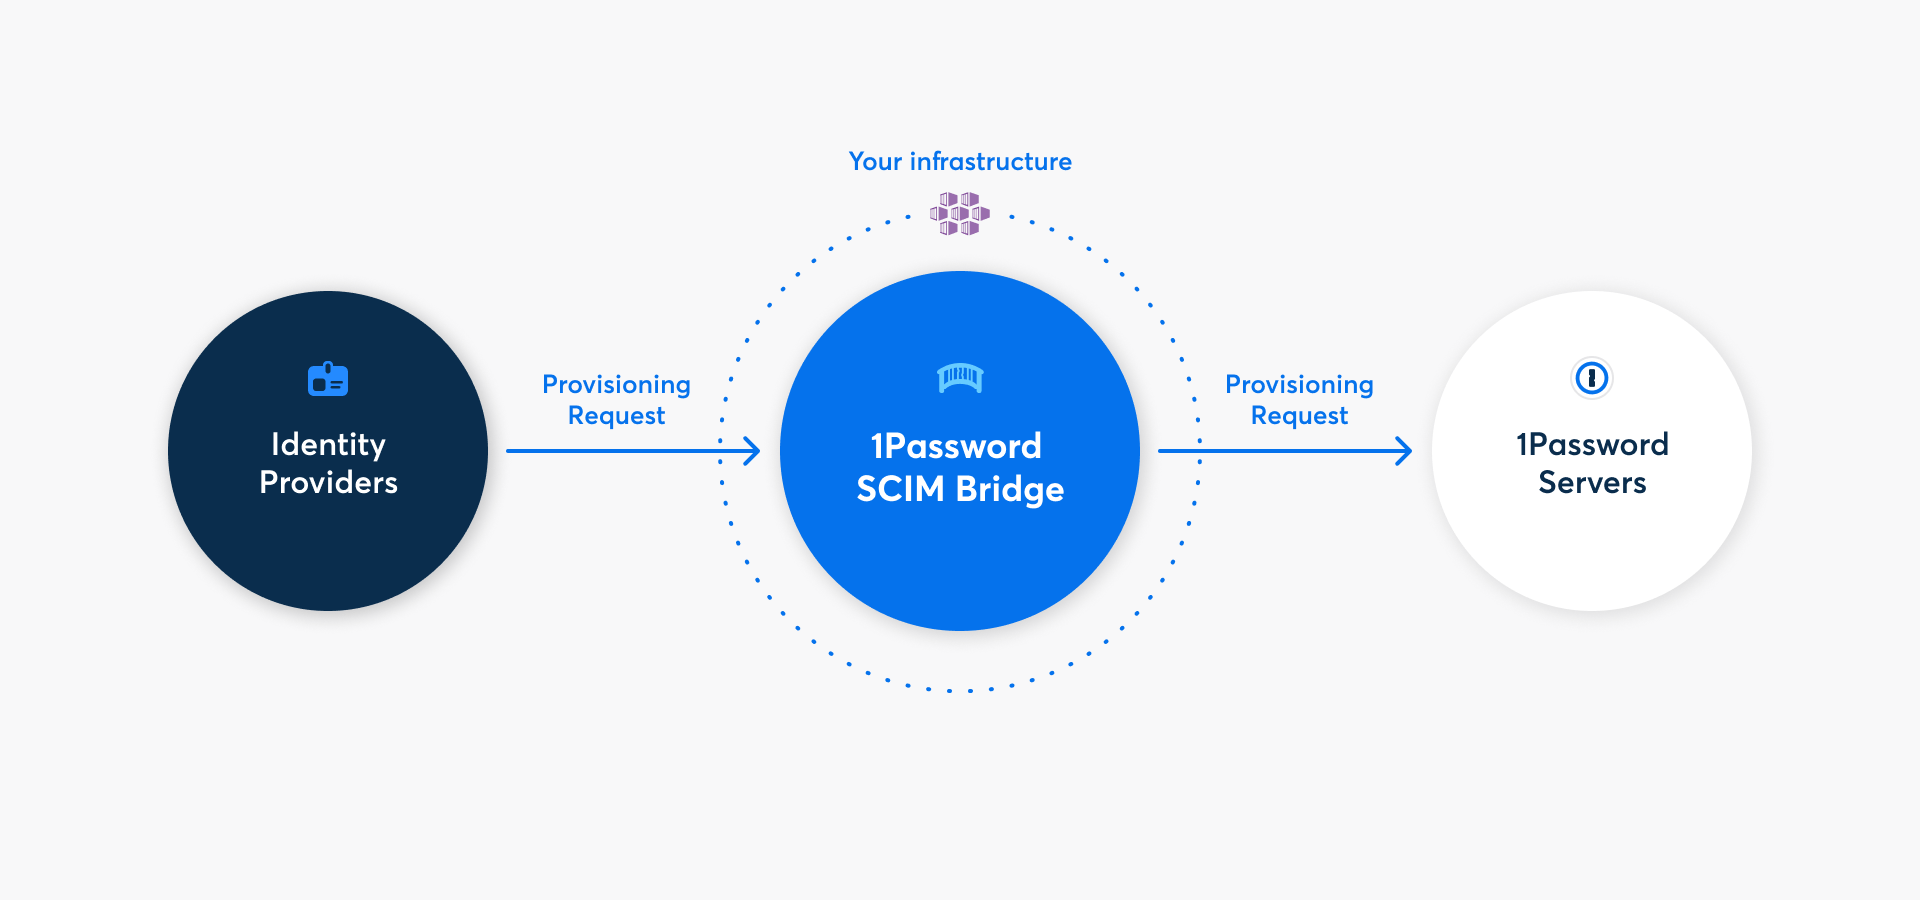
Mit 1Password Business kannst du viele gängige Verwaltungsaufgaben mit der 1Password SCIM-Bridge automatisieren. Es nutzt das SCIM-Protokoll (System for Cross-Domain Identity Management), um 1Password mit deinem bestehenden Identitätsanbieter wie Google Workspace, JumpCloud, Microsoft Entra ID, Okta, OneLogin oder Rippling zu verbinden.
Du kannst 1Password SCIM-Bridge auf Azure Container Apps bereitstellen, indem du die folgenden Schritte ausführst. Alternativ kannst du auf Azure Kubernetes Service bereitstellen.
Schritt 1: Füge deinem 1Password-Konto Provisioning hinzu
Bevor du die 1Password SCIM-Bridge einsetzen kannst, musst du die Bereitstellungsintegration hinzufügen und die entsprechenden Anmeldedaten besorgen. Klicke unten auf Erste Schritte und melde dich bei deinem 1Password-Account an. Wähle deinen Identitätsanbieter im Abschnitt „Benutzerbereitstellung“ aus. Anschließend wählst du in den Bereitstellungsoptionen Benutzerdefiniert und folgst den Anweisungen auf dem Bildschirm.
Wenn du die Details einer bestehenden Bereitstellungsintegration siehst, musst du sie zuerst deaktivieren. Klicke auf Weitere Aktionen und wähle Bereitstellung deaktivieren.
Nachdem du den Einrichtungsprozess abgeschlossen hast, erhältst du eine scimsession-Datei und ein Bearer-Token. Speichere beides in 1Password und speichere die scimsession-Datei auf deinem Computer. Du brauchst sie, um die SCIM-Bridge einzurichten und deinen Identitätsanbieter zu verbinden.
Wichtig
Das Bearer-Token und die scimsession-Datei, die du bei der Einrichtung erhältst, können zusammen verwendet werden, um auf Informationen aus deinem 1Password-Konto zuzugreifen. Du musst das Bearer-Token mit deinem Identitätsanbieter teilen. Allerdings solltest du es niemals an andere Personen weitergeben. Außerdem solltest du deine scimsession-Datei niemals an andere weitergeben.
Schritt 2: Setze deine SCIM-Bridge ein
2.1: Lade die Container-App-Vorlage
- Lade die Azure Resource Manager-Vorlagendatei herunter.
- Melde dich im Microsoft Azure-Portal bei deinem Konto an und navigiere zur Seite Benutzerdefinierte Bereitstellung.
- Wähle die Option Eigene Vorlage im Editor erstellen.
- Wähle Datei laden und wähle dann die Vorlagendatei aus, die du zuvor heruntergeladen hast.
- Wähle Speichern aus.
2.2: Konfiguriere und stelle die Container-App bereit
- Fülle die folgenden Felder aus:
- Abonnement: Wähle das Abonnement, das du bevorzugst.
- Ressourcengruppe: Wähle eine bestehende Ressourcengruppe oder erstelle eine neue.
- Region: Wähle die Region, die du bevorzugst.
- Container App Name: Gib einen Namen ein, den du verwenden möchtest. Standardmäßig lautet der Name
op-scim-con-app. - Container App Env Name: Gib einen Namen ein, den du verwenden möchtest. Standardmäßig lautet der Name
op-scim-con-app-env. - Container App Log Analytics Name: Gib einen Namen ein, den du verwenden möchtest. Standardmäßig lautet der Name
op-scim-con-app-log-analytics. - Scimsession: Füge den Inhalt deiner
scimession-Datei ein. - Workspace-Akteur: Wenn du Google Workspace als Identitätsanbieter verwendest, gib die E-Mail-Adresse eines Google Workspace-Administrators für das Dienstkonto ein. Wenn du Google Workspace nicht nutzt, kannst du dieses Feld leer lassen.
- Workspace-Anmeldeinformationen: Wenn du Google Workspace als deinen Identitätsanbieter verwendest, füge den Inhalt der
.json-Schlüsseldatei ein, die du als Teil der Google Workspace-Einrichtung heruntergeladen hast. Wenn du Google Workspace nicht nutzt, kannst du dieses Feld leer lassen.
- Wähle Überprüfen + Erstellen.
- Wenn die Überprüfung erfolgreich war, wähle Erstellen. Die Bereitstellung wird ein paar Minuten dauern.
Schritt 3: Teste deine SCIM-Bridge
Nachdem du deine SCIM-Bridge bereitgestellt hast, führe diesen Test durch, um sicherzustellen, dass sie online ist:
- Wähle Zur Ressourcengruppe und wähle die von dir erstellte Container-App aus.
- Wähle in der Seitenleiste die Option Übersicht und dann den Link Application Url. Dies ist die URL deiner SCIM-Bridge.
- Melde dich mit deinem Bearer-Token an und überprüfe, ob deine SCIM-Bridge mit deinem 1Password-Konto verbunden ist.
Schritt 4: Verbinde deinen Identitätsanbieter mit der SCIM-Bridge
Wichtig
Wenn du bereits 1Password Business verwendest, solltest du sicherstellen, dass die E-Mail-Adressen und Gruppennamen in deinem 1Password-Konto mit denen deines Identitätsanbieters übereinstimmen.
- Wenn jemand eine andere E-Mail-Adresse in 1Password verwendet, bitte ihn oder sie, diese zu ändern.
- Falls du bereits bestehende Gruppen in 1Password hast, die du mit Gruppen in deinem Identitätsanbieter synchronisieren möchtest, passe die Gruppennamen in 1Password an.
Da die 1Password SCIM-Bridge einen SCIM 2.0-kompatiblen Webservice bietet, der OAuth-Bearer-Token zur Autorisierung akzeptiert, kannst du sie mit einer Vielzahl von Identitätsanbietern nutzen.
Erfahre, wie du deinen Identitätsanbieter verbinden kannst:


Unterstützung erhalten
Hol dir Hilfe bei der SCIM-Bridge, zum Beispiel wenn du dein Bearer-Token oder deine Sitzungsdatei verloren hast.
Um weitere Hilfe zu erhalten oder Feedback zu geben, kontaktiere den 1Password Business Support oder nimm an der Diskussion mit der 1Password Support Community teil.
Mehr erfahren
- 1Password SCIM Bridge aktualisieren
- Das Intervall für die automatische Bestätigung von Teammitgliedern in 1Password SCIM Bridge anpassen
- (GitHub) Erweiterte Details zur 1Password SCIM Bridge auf Azure Container Apps
War dieser Artikel hilfreich?
Freut mich, das zu hören! Wenn du etwas hinzufügen möchtest, zögere nicht, uns zu kontaktieren.
Tut mir leid, das zu hören. Bitte kontaktiere uns, wenn du uns mehr darüber erzählen möchtest.