
Bereitstellung
- Benutzer erstellen. Benutzer, die in Rippling erstellt wurden, werden auch in 1Password erstellt.
- Benutzerattribute aktualisieren. Wenn du die Benutzerattribute in deinem Verzeichnis änderst, werden die zugeordneten Attribute in 1Password aktualisiert.
- Benutzer deaktivieren: Wenn du einen Benutzer deaktivierst oder den Zugriff des Benutzers auf 1Password in Rippling sperrst, wird der Benutzer in 1Password gesperrt.
Gruppen verwalten
- Gruppenmitgliedschaften synchronisieren. 1Password-Gruppen sind in Rippling verfügbar. Alle Änderungen, die du an den Gruppenmitgliedschaften vornimmst, werden automatisch mit 1Password synchronisiert.
- Teams und Abteilungen verwenden. Du kannst deine Rippling-Teams und -Abteilungen verwenden, um Benutzer zu 1Password-Gruppen hinzuzufügen und zu entfernen.
Melde dich zunächst bei deinem Konto auf der Rippling.com an und folge den beschriebenen Schritten.
Before you begin
Bevor du 1Password mit Rippling integrieren kannst, benötigst du Folgendes:
- Richte die 1Password SCIM Bridge auf deiner eigenen Infrastruktur ein und stelle sie bereit oder nutze das Rippling Auto-Hosting zur Bereitstellung.
- Sicherstellung, dass die Bereitstellung von Benutzern und Gruppen auf der Seite „Automatisierte Benutzerbereitstellung“ deines 1Password-Kontos aktiviert ist.
Schritt 1: Füge die 1Password-Anwendung zu Rippling hinzu
So fügst du die 1Password-Anwendung zu Rippling hinzu:
- Klicke auf Add New App (Neue App hinzufügen).
- Suche nach 1Password und klicke darauf.
- Auf der 1Password-Anwendungsseite klicke auf Connect Account (Konto verbinden).
Schritt 2: Konfiguriere die Anwendung
Wenn du Besitzer oder Administrator deines Geschäftskontos bist, klicke auf I’m the 1Password admin, I’ll install it (Ich bin der 1Password-Admin, ich werde es installieren).
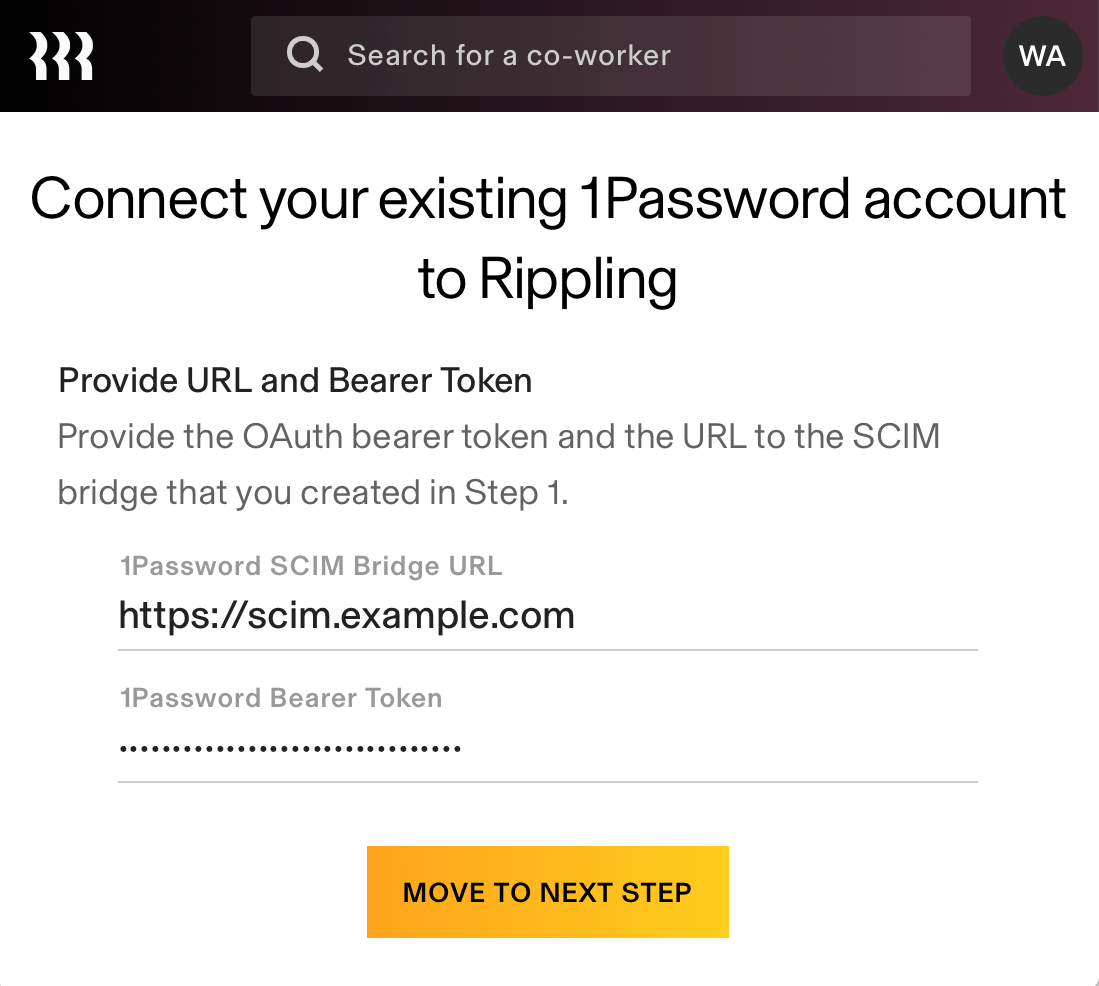
Gib bei der entsprechenden Aufforderung die SCIM-Bridge-URL und dein Bearer-Token ein.
1Password SCIM Bridge URL: die URL deiner SCIM-Bridge (nicht die Anmeldeadresse deines 1Password-Kontos). Zum Beispiel:
https://scim.example.comWenn du deine URL nicht kennst, stelle sicher, dass du die SCIM-Bridge eingerichtet und bereitgestellt hast.
1Password Bearer Token: das Bearer-Token für deine SCIM-BridgeWenn du deinen Bearer-Token nicht hast, kannst du hier erfahren, wie du ihn bekommst.
Klicke auf Move To Next Step (Zum nächsten Schritt) und folge dann den Anweisungen auf dem Bildschirm, um die Rippling-Konfiguration abzuschließen.
2.1: Attributzuordnung konfigurieren
Von der Anwendungsseite, zu der du nach dem vorherigen Schritt gelangst, konfiguriere die Attributzuordnung, damit E-Mail-Änderungen zwischen Rippling und 1Password synchronisiert werden:
- Wähle Settings (Einstellungen) und dann Attribute mapping (Attributzuordnung) aus.
- Wähle Edit (Bearbeiten), dann ändere das Feld Cadence (Kadenz) des Attributs Anzeigename zu On user creation and updates (Bei Benutzererstellung und -aktualisierungen).
Next steps
Wenn du die Bereitstellung aktivierst, werden bestehende 1Password-Nutzer mit Rippling-Nutzern verknüpft, sofern ihre E-Mail-Adresse übereinstimmt. Wenn ihre E-Mail-Adresse abweicht, werden sie erneut zu 1Password eingeladen. Achte also darauf, dass alle betroffenen Teammitglieder vor dem Aktivieren der Bereitstellung ihre E-Mail-Adresse aktualisieren.
If a team member hasn’t accepted their invite after 2 days, they’ll receive a reminder email. Invites don’t expire.
Wenn du bestehende Gruppen in 1Password hast, die du mit Rippling synchronisieren möchtest, füge sie den Gruppen hinzu, die durch Bereitstellung verwaltet werden:
- Melde dich an, bei deinem Konto auf 1Password.com.
- Wähle in der Seitenleiste Integrationen und wähle Automatisierte Benutzerbereitstellung aus.
- Wähle im Abschnitt „Verwaltete Gruppen“ die Option Verwalten und wähle dann die Gruppen aus, die synchronisiert werden sollen.
Wenn du zuvor SCIM-Bridge verwendet hast, musst du alle Gruppen auswählen, die bereits mit Rippling synchronisiert wurden. So vermeidest du Probleme bei der Synchronisierung mit deinem Identitätsanbieter, einschließlich doppelter Gruppen.
Tipp
Learn about best practices for using automated provisioning.
Verwalte deine Einstellungen
Um zu verwalten, wer für 1Password freigeschaltet wird, klicke auf Zugriffsregeln und wähle Bearbeiten.
Um die Mitarbeiter eines Teams oder einer Abteilung zu einer 1Password-Gruppe hinzuzufügen:
- Klicke in der 1Password-Anwendung auf die Registerkarte Gruppen.
- Klicke neben der Gruppe auf Bearbeiten.
- Gib den Team- oder Abteilungsnamen ein, klicke darauf und dann auf Bestätigen.
Weitere Informationen findest du im Rippling-Hilfecenter.
Unterstützung erhalten
Falls Benutzer und Gruppen nicht bereitgestellt werden, stelle sicher, dass die Bereitstellung in deinem 1Password-Konto aktiviert ist:
- Melde dich an, bei deinem Konto auf 1Password.com.
- Wähle in der Seitenleiste Integrationen aus.
- Wähle Automatisierte Benutzerbereitstellung.
- Stelle sicher, dass Bereitstellung von Benutzern und Gruppen aktiviert ist.
War dieser Artikel hilfreich?
Freut mich, das zu hören! Wenn du etwas hinzufügen möchtest, zögere nicht, uns zu kontaktieren.
Tut mir leid, das zu hören. Bitte kontaktiere uns, wenn du uns mehr darüber erzählen möchtest.