![]()
Mit 1Password Business kannst du 1Password mit JumpCloud integrieren, um viele gängige Verwaltungsaufgaben zu automatisieren:
Bereitstellung
- Benutzer erstellen. Benutzer, die in JumpCloud erstellt wurden, werden auch in 1Password erstellt.
- Benutzerattribute aktualisieren. Wenn du die Benutzerattribute in deinem Verzeichnis änderst, werden die zugeordneten Attribute in 1Password aktualisiert.
- Benutzer deaktivieren: Wenn du einen Benutzer deaktivierst oder den Zugriff des Benutzers auf 1Password in Jumpcloud sperrst, wird der Benutzer in 1Password gesperrt.
Import
- Benutzer importieren. Benutzer, die in 1Password erstellt wurden, werden mit bestehenden JumpCloud-Benutzern abgeglichen.
Synchronisierungsgruppen
- Gruppen pushen. Gruppen, die in JumpCloud erstellt werden, werden auch in 1Password erstellt, und Änderungen an der Gruppenzugehörigkeit in JumpCloud werden ebenfalls in 1Password vorgenommen.
To get started, sign in to your account on the JumpCloud Administrator Portal and follow these steps.
Before you begin
Before you can integrate 1Password with JumpCloud, you’ll need to:
- Zu der Gruppe Eigentümer oder Administratoren in deinem 1Password Business-Konto gehören.
- Make sure all existing 1Password team member email address domains are in the allowed domains list. Public domains, such as gmail.com, aren’t currently supported.
Step 1: Turn on provisioning in 1Password
- Melde dich an, bei deinem Konto auf 1Password.com.
- Wähle in der Seitenleiste Einladungen aus.
- Select JumpCloud in the User Provisioning section.
- Select Set up hosted provisioning.
- Save your credentials in 1Password in case you need them later, then select Next.
- Leave this page open and continue to step 2.
Step 2: Add the 1Password application to JumpCloud
These steps were recorded in April 2026 and may have changed since. Refer to the JumpCloud documentation for the most up-to-date steps.
So fügst du die 1Password Business-Anwendung zu JumpCloud hinzu:
- Select SSO Applications in the Access section in the sidebar.
- Select Add New Application and search for
1Password. - From the results, select 1Password > Next.
- Optionally enter
1Password Businessfor the display label. - Gib im Feld Bookmark-URL die Anmeldeadresse für dein 1Password Business-Konto ein. Zum Beispiel:
https://example.1password.com. - Select Save Application, then select Configure Application.
Step 3: Configure the application
3.1: Set up the integration
Gehe auf der Registerkarte Identitätsmanagement der 1Password Business-Anwendung folgendermaßen vor:
- Stelle sicher, dass die Verwaltung von Benutzergruppen und Gruppenmitgliedschaften in dieser Anwendung eingeschaltet ist.
- Select Configuration Settings in the Identity Management section.
- Fülle die folgenden Felder aus:
- Base URL: Copy and paste your SCIM URL from the hosted provisioning setup page (not your 1Password account sign-in address). Do not include a trailing slash. For example:
https://provisioning.1password.com/scim/v2. - Token Key: Copy and paste your bearer token from the hosted provisioning setup page.
- Base URL: Copy and paste your SCIM URL from the hosted provisioning setup page (not your 1Password account sign-in address). Do not include a trailing slash. For example:
- Select Update.
3.2: Set up provisioning to 1Password
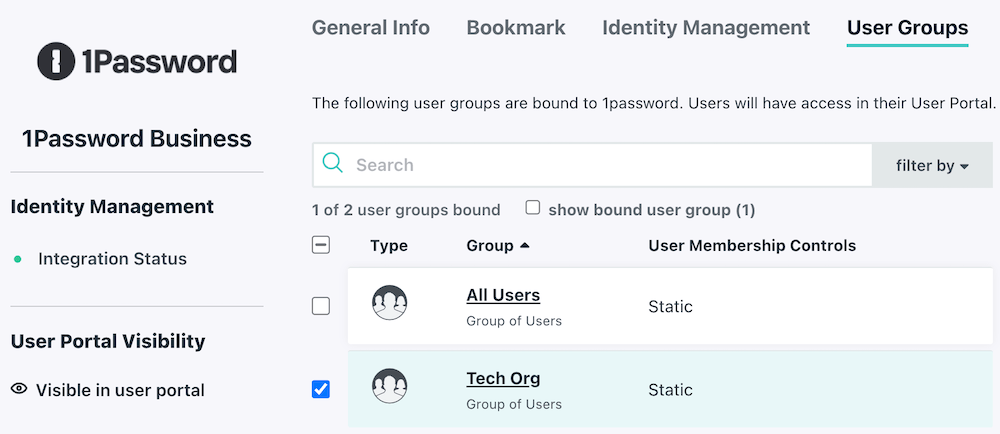
- Select the User Groups tab.
- Choose the groups you’d like to provision to 1Password, then select Save.
Next steps
When you turn on provisioning, existing 1Password users will be linked to JumpCloud users if their email address matches. If their email address is different, they’ll be invited to 1Password again, so make sure any affected team members update their email address before you turn on provisioning.
If a team member hasn’t accepted their invite after 2 days, they’ll receive a reminder email. Invites don’t expire.
Wenn du bestehende Gruppen in 1Password hast, die du mit Jumpcloud synchronisieren möchtest, füge sie den Gruppen hinzu, die durch Bereitstellung verwaltet werden:
- Melde dich an, bei deinem Konto auf 1Password.com.
- Select Integrations in the sidebar, then select Hosted Provisioning.
- Select Manage in the Managed Groups section, then select the groups to sync.
Tipp
Learn about best practices for using automated provisioning.
Verwalte deine Einstellungen
To manage assigned users and groups, open the 1Password Business application and select User Groups.
- To add or remove a user group, select or deselect the checkbox beside the group you want to add or remove, then select Save.
- To add or remove a user, select the group where you want to add or remove a user. In the configuration panel for the group, select Users. Select or deselect the checkbox beside the user you want to add or remove from the group, then select Save.
Erfahre mehr darüber, wie du Benutzer für eine Anwendung in JumpCloud autorisierst.
To turn off synchronization, open the 1Password Business application and select Deactivate IdM connection. Select Confirm, then select Save.
Erfahre mehr über die Nutzung von JumpCloud für das Identitätsmanagement mit 1Password.
Unterstützung erhalten
Falls Benutzer und Gruppen nicht bereitgestellt werden, stelle sicher, dass die Bereitstellung in deinem 1Password-Konto aktiviert ist:
- Melde dich an, bei deinem Konto auf 1Password.com.
- Wähle in der Seitenleiste Einladungen aus.
- Select Hosted Provisioning.
- Make sure Sync 1Password with my identity provider is turned on.
War dieser Artikel hilfreich?
Freut mich, das zu hören! Wenn du etwas hinzufügen möchtest, zögere nicht, uns zu kontaktieren.
Tut mir leid, das zu hören. Bitte kontaktiere uns, wenn du uns mehr darüber erzählen möchtest.