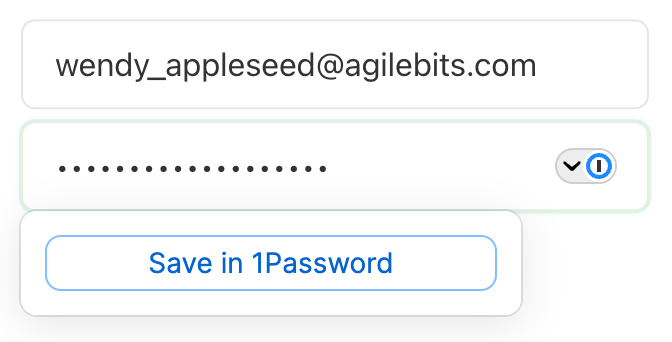
Speichere ein Login
Um einen Login zu speichern, gib deinen Benutzernamen und dein Passwort ein. Wähle dann In 1Password speichern.
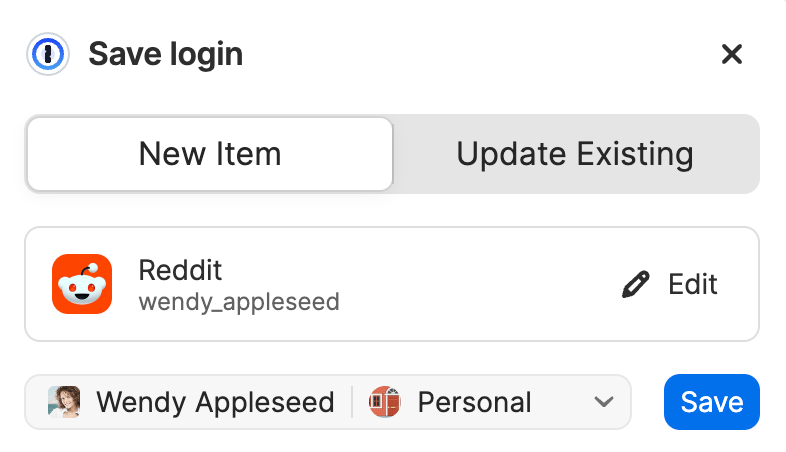
You can edit the name of the login and the vault where you want to save it. Then select Save.
1Password will save your username and password, along with the information entered in other fields.
If you forget to choose Save in 1Password, 1Password may automatically offer to save or update your login after you sign in to a website. Select Save or Update in the pop-up to save or update your credentials. Learn how to manage your autosave settings.
Your web browser might also ask to save your passwords. Because you’re using 1Password, you don’t need to save your passwords in your browser. Learn how to turn off your browser’s password manager.
Sign in to a website
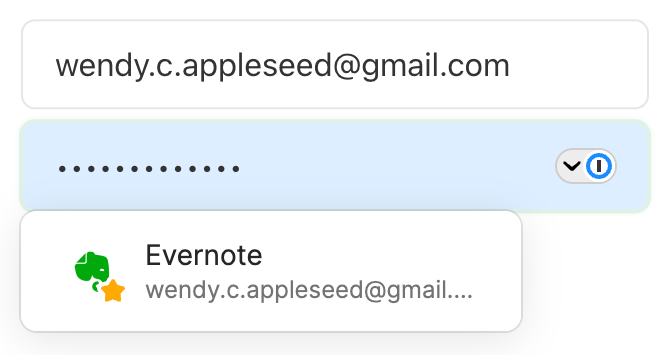
After you’ve saved your username and password for a website, 1Password can fill them for you.
On the sign-in page of a website, select the username or password field, then choose the login you want to fill.
If 1Password suggests more than one item, you can use the arrow keys to choose the one you want, or start typing to filter your items.
After you choose the login you want, 1Password will automatically sign you in on the website.
Learn how to manage your settings if you don’t want 1Password to automatically submit forms after filling a login.
Tipp
Um eine Website zu öffnen und deinen Benutzernamen und dein Passwort einzugeben, wähle ![]() in der Symbolleiste deines Browsers aus. Wähle das Login für diese Seite aus und wähle dann Öffnen und Ausfüllen.
in der Symbolleiste deines Browsers aus. Wähle das Login für diese Seite aus und wähle dann Öffnen und Ausfüllen.
Sign up for a new account on a website
1Password will create a strong password for you whenever you sign up for an account on a website.
- Enter your account details on the sign-up page.
1Password kann Benutzernamen und E-Mail-Adressen aus deinen Identitätselementen vorschlagen.
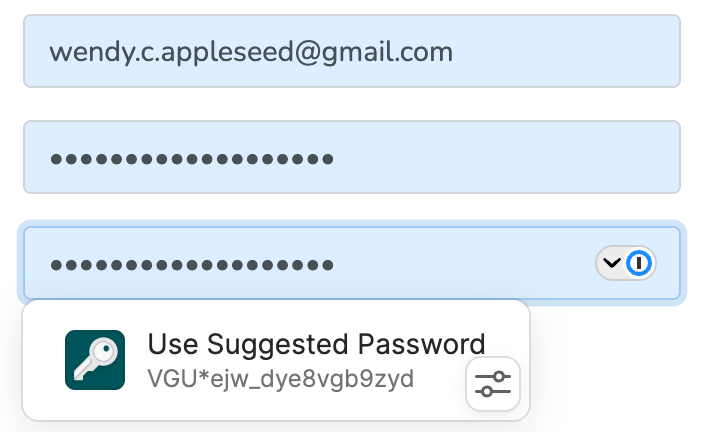
- Select the password field then choose Use Suggested Password. Or select
 and choose Password Generator to create a custom password.
If you don’t see Use Suggested Password, select
 in the field.
 - 1Password will ask you to save your new login. Select Save.
If you forget to choose Save in 1Password, 1Password may automatically offer to save or update your login after you sign in to a website. Select Save or Update in the pop-up to save or update your credentials.
Manage settings
To manage saving and filling settings for logins and other items:
- Öffne und entsperre 1Password in deinem Browser.
- Select the account menu in the top left corner of the pop-up and choose Settings.
- Select Autofill and save.
You’ll find these settings and options:
- Offer to save and fill logins and other items in form fields: 1Password will show prompts under form fields to fill, save, or update your items.
- Show autofill suggestions when a form field is in focus: 1Password will automatically show autofill suggestions when you select form fields.
- Offer to save items in autofill suggestions: 1Password will offer to save new items with the “Save in 1Password” button under form fields.
- Offer to save and sign in with passkeys: 1Password will automatically prompt you to save or update passkeys and suggest signing in with passkeys on linked websites.
- Allow caching passkey IDs in local storage: 1Password will only suggest a passkey when it knows you have one saved for a website, even when 1Password is locked.
- Sign in automatically after autofill: 1Password will automatically submit forms after you’ve filled a username and password.
To turn off automatic submission for specific logins, select the 1Password icon in your browser and choose your login, then select the ellipsis > Don’t sign in automatically.
- New items get saved in: Choose a default vault where new items will be saved.
- Offer to save: 1Password will automatically prompt you to save or update items. You can manage this setting for logins, credit cards, contact information, one-time passwords, and “sign in with” logins.
Unterstützung erhalten
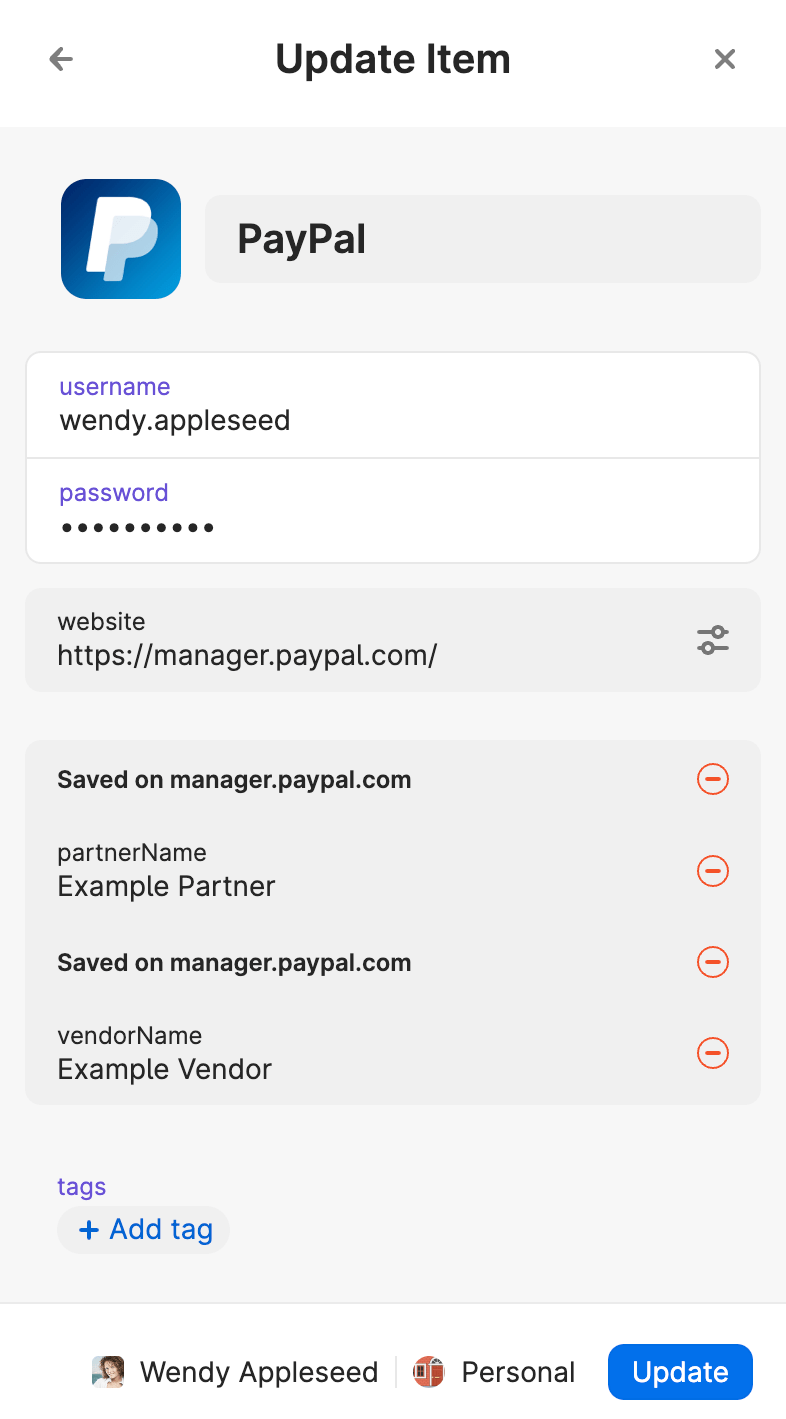
If you need to save additional fields on a website
1Password automatically detects information you enter in other fields on a website when you save a login, and it can fill those additional fields when you sign in to a website.
If you already saved a login for a website, but you need to add additional fields to your Login item, follow these steps:
- Use 1Password to fill your username and password.
- Enter your details in the other fields you’d like to save.
- Right-click
 in your browser’s toolbar and choose Save > Login.
Learn what to do if you don't see the 1Password icon in your browser's toolbar.
- 1Password will ask if you want to update your existing item. Make sure you see the additional fields, then select Update.
Erfahre, was zu tun ist, wenn 1Password dich auffordert, ein neues Anmelde-Element zu speichern, anstatt dein bestehendes Anmelde-Element zu aktualisieren.
If you have multiple logins for the same website
Wenn du mehrere Anmeldedaten für dieselbe Website speicherst, wird 1Password dir alle deine Anmeldedaten vorschlagen, wenn du dich auf dieser Website anmeldest. Befolge diese Tipps, um die Reihenfolge deiner vorgeschlagenen Anmeldungen zu verbessern:
- Add logins to your Favorites. You can mark an item as a favorite if you’d like it to show up at the top of the list of suggestions for a website, regardless of the full URL.
- Edit the title of the Login item with additional information. For example, if you have multiple Google accounts, you can change the title of each Login item to specify what it’s used for (“Google - Personal” or “Google - Work”). Then you can search for the title of the Login item you want in the username or password field to filter your suggested logins.
- Make sure the Login item has the full URL for the website. For example, if you have multiple Slack accounts, you can edit your Slack Login items to include the workspace in the website field (https://example1.slack.com, https://example2.slack.com, and so on). Then you’ll see the appropriate login at the top of the suggestions list when you sign in to that Slack workspace in your browser. You can also change where a login is suggested and filled.
If you sign in to a site with a supported provider
If you want to sign in to a website with a supported sign-in provider, like Google or Facebook, 1Password can save a Login item for that site with information about the provider you use to sign in. The next time you visit the sign-in page for that website, 1Password will offer to sign you in to the site with the provider you saved in the item. Learn how to use 1Password to sign in to sites with supported providers.
Mehr erfahren
- Erste Schritte mit 1Password in deinem Browser
- Verwende den Passwortgenerator, um deine Passwörter zu ändern und zu stärken
- Ändern, wo eine Anmeldung vorgeschlagen und ausgefüllt wird
You can also fill passwords:
War dieser Artikel hilfreich?
Freut mich, das zu hören! Wenn du etwas hinzufügen möchtest, zögere nicht, uns zu kontaktieren.
Tut mir leid, das zu hören. Bitte kontaktiere uns, wenn du uns mehr darüber erzählen möchtest.